
Not too long ago, I was faced with the most hated and feared of all leftover situations….the dreaded LEFTOVER leftovers (GASP !).
Way back before time began (OK, last winter to be honest) I made one of my favorite recipes for a pork roast. You take a shoulder roast (sometimes called a butt for some unknown, butchery reason…), either bone-in or boneless works fine, rub it well with 2 parts chipotle chile powder to 1 part kosher salt, and toss the meat into a roasting pan or Le Creuset-type Dutch oven. Cover the pan with foil or the lid, and throw THAT into a preheated 275° oven for about 3&1/2 to 4 hours, and then pull the pan from the oven, let the meat rest for about 15 minutes, and pull it into shreds and chunks with 2 forks. Served on warm corn tortillas (homemade is best, come on…….YOU can do it, I showed you how), with a sprinkle of cilantro and a drizzle of fresh-squeezed lime juice (OK, simple salsa cruda if you must), folded over to make simple, soft tacos, well, that’s about the best eats you can get. One of my favorite techniques, ever.
And the initial round of leftovers makes great enchiladas or tostadas, mixed with the appropriate sauces and cheese and other add-ons. Or spectacular pulled pork, gently reheated with some barbeque sauce. Homemade would be best, but Trader Joe’s (yeah, TJ’s again, so…..?) “Kansas City BBQ Sauce” is a perfectly fine alternative. And the leftovers chill out in the freezer really, really well.
Which is where my about 1 pound hunk of chipotle slow-roasted pork shoulder has been hanging out since about January, when I made it. In the freezer, that is. A couple of weeks ago, I got a hankering for some pulled pork sandwiches. I’d gotten a lovely, small head of tender, just harvested cabbage from The Growing Experience in my share, and that cried out for slaw. Which led to pulled pork sandwiches. I had the requisite TJ’s BBQ sauce in the fridge, I had the makings for slaw, I had hamburger buns in the freezer as well, so sounds like dinner to me.
So I pulled the pork out and let it thaw (it was already shredded down when I froze it). The day I made the sandwiches, I plopped the shredded pork in a saucepan, and added just enough of the bottled sauce to moisten it. I have a bad habit of making this dish too drippy when I reheat the meat in the sauce (same technique works for slow-cooked roast beef as well, try it with brisket and swoon), so I was careful to use just enough BBQ sauce to loosen up the shredded meat. Heat it over a very low flame for at least half an hour, covered. As it warms up, the meat will release some liquid, and the steam will condense back up and drop down into the saucepan, to help “juice up” the mixture. Which is why you want to go easy on the sauce you add to the meat.
Yes. The sandwiches were great. Some standard slaw (with a hit of horseradish in the dressing) and bread and butter pickles on the pulled pork, it was delightful.
But, not only have I digressed (which is not all that surprising, now is it….?), I have gone completely off track. Because this post is NOT about using left-over slow roasted meat for pulled BBQ sandwiches, delightful though that may be, it’s about using the LEFTOVERS from that.
And finding your inner peace with the never-ending wheel of leftovers. As in…the Tao of bao.
As it turns out, bao are really easy to recreate at home, and a perfect way to use up, guess what…LEFTOVERS !
It all starts with the dough, as it so frequently does.
It’s pretty standard dough. Yeast, warm water, sugar, oil and salt. You mix that together in the bowl of your mixer,

and let it stand for about 15 minutes until it bubbles up a bit. Again, I’m using instant yeast, so I won’t get the furious bubbling I’d get with the active dry yeast. But, again, both types of yeast will work.

That’s my mix after about 15 minutes. You can see there’s a difference, but it’s not dramatic. No fears, the yeastie bugs will work just fine.
Then add in the flour, put the bowl on the machine, and let ‘er rip for about 10 minutes. You want a smooth and elastic dough. I’d made these little pretties before, using the same recipe, back around February I think, and I found that this time around, probably because the weather was much less humid, that the dough was MUCH stiffer (much) and needed more water to even get it to a dough-like state.
No worries. If you find, as you’re working with dough, any dough, that it doesn’t look *right*, adjust with MINUSCULE amounts of either flour or water (flour for dough that’s too loose, water or other liquid for dough that’s too tight). I can’t stress the concept of MINUSCULE enough. From painful experience, I can tell you that a dough can go from too wet/dry to the other end of the spectrum in a heartbeat. Literally less than a tablespoon of one or the other can push you over the edge, and cause you to need to adjust the other direction. When you add flour or water, and you should have enough courage to do so if the dough doesn’t look *right* to you, go slow. Dribble in the water. Sprinkle in the flour. Let the addition work in, then add more if you need to. But by all means don’t be afraid to adjust. Sometimes you just have to.
Like this time. I actually ended up adding about a quarter of a cup more water. It was a very dry day, and had been dry for a while, so my flour reflected that. Have faith. Work with what you got, and what the weather gods have given you. Because the weather gods WILL affect your baking. You need to have the “courage of your convictions” to be able to adjust.
OK, then. We’ve adjusted, carry on.
After about 10 minutes, I had the smooth and elastic dough. It was very stiff. I was actually afraid I was going to blow out the motor on the Ol’ Faithful KA, but she persevered. Into the oiled doubler for a little rest.

Meanwhile, I got to thinkin’ about the filling. I took about half of an onion, and chopped it up pretty finely. Tossed it into a sauté pan with some neutral vegetable oil (not olive oil, I didn’t want that flavor). Let it soften up a bit,

then tossed in the shredded, BBQ-sauced chipotle roast pork. I probably had about 2 cups of that, and remember, it had already been seasoned first with the chipotle chile powder and then with BBQ sauce.

But I wanted to amp up the Asian flavors a bit, so I drizzled in a bit of soy sauce, some sesame oil and some chile oil. As I heated up the pork, I broke down any large chunks that still remained in the mix. When the flavors had blended, I pulled it off the heat for a bit to sit. You don’t want it screamin’ hot when you stuff the bao.

At this point, I’d say the yeastie bugs had done their job.

Using your trusty scale, divide the dough in half, and adjust to make them equal as needed. The recipe says to shape the dough into a rectangle and divide it, but I found it easier to make a long roll, then chunk it up.

Then divide each half into thirds.

And each third into half again (we’re making 12 bao).

Keep the dough you’re not working with under a towel to prevent it from drying out.
Roll each little blob of dough into about a 4&1/2 to 5&1/2-inch round (I found the larger size to be better). To roll a neat round, start with a ball of dough, flatten it out slightly with your palm, and then take your rolling pin and roll in one direction only, taking care not to flatten the edges too much. Then, using your bench knife you if need it to loosen the dough from the board, rotate the dough 1/4 turn, and roll again, in the same direction (i.e., top to bottom or right to left). Lather, rinse, repeat until you have the size you need.
Use your ruler.

Even though the dough had been semi-recalcitrant when mixing/kneading it, it was very easy to work with during the rolling/shaping process. You won’t need much additional flour on the board to keep it from sticking, just your trusty board knife to loosen it a bit. But a bit of additional flour is handy to have, just in case, or in case it wants to cling to your rolling pin.
After you’ve gotten the proper size round, pick the dough circle up in your hands, and try to thin the edges a bit so you don’t have a dough glob at the edges when you go to seal the dumplings. I found that using the same technique I use for pizza dough, enlisting the aid of our friend Mr. Gravity, made that job a bit easier. Just pick the circle up, and, holding between the fingers of both hands, gently rotate it around and press the edges, letting the bulk of the dough hang down from your fingers. The edges will stretch out a bit, and life will be good.
Then, we’re ready to fill. Lay the round back on the board, and put about 2 tablespoons of the filling in the middle.

Then, pick up the little bundle in your non-dominant hand (alternatively, you can just drape the dough over the palm of that hand, and put the filling in while you’re holding it), and pinch and “pleat” the edge of the dough around and over the filling. Pictures get a bit wonky at this point, damn it all, I just don’t have three hands to fill, fold and SHOOT at the same time !

What you want to end up with is a round ball of dough enclosing the savory filling. Hopefully, if you’ve pinched and pleated correctly, the filling will be entirely covered. You can use the thumb of the hand holding the bao to sort of help shove the filling down into the bundle as you’re pinching and pleating with the other hand.
It’s really not as complicated as it sounds. I can’t ride a bike, but I can make bao.
When the filling is completely covered, take your fingers and grab all those little edges of the dough, and give them a little twist. You want to make sort of a top-knot of the dough ends.

Then, put the ball back on the board, and give it our favorite “cup, tuck and roll” move we use for round loaves of bread, buns and rolls. Same deal-io here. Check the seal one more time, and re-pinch and re-cup, tuck and roll as needed.
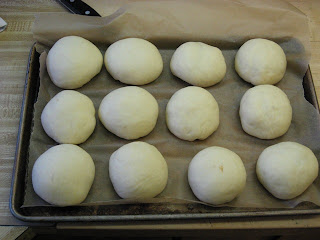
When you’ve filled all of your dough (recipe makes 12), plop them, seam side down, onto a baking sheet (skanky or not, your choice) lined with parchment or a Silpat. If you’re really anal, or really wanting to be authentic, you could cut a square of aluminum foil for each little dumpling to sit on, but for me, the parchment on a skanky pan works fine.

The lining under them is quite important. Although the dough is easy to work with, it will stick. Repeat, it will stick, and it will especially stick when you cook them.
Let them sit, covered, for about half an hour. You want them to get puffy and light, although they will not double.
Time to cook.
You definitely want to use a bamboo steamer. The first time I made these (it may have even been with this same pork roast before it went into the deep freeze…), I just used one of those metal “petal” steamers you put in the bottom of a small saucepan to steam veggies….
Ummm, I ended up with one GIANT, melded bao.

They tasted good, though.
So, you want to not crowd the bao. They need some space, man. Actually, even this batch was a little crowded, even using two of these:

Under each of the lil’ dumplin’s I put a square of parchment that I’d cut to sort of the size of the dough ball. Traditionally, lettuce or cabbage leaves are used, but foil or parchment works. Fill each steamer tray with the bao on their little diapers. Again, trust me. You *want* a diaper of some sort. Getting the steamed dough out of the slats of those steamers is not fun. Don’t ask how I know (and they don’t go in the dishwasher like the metal steamer does….’nuff said !). This is the place you want to use the little squares. If you lined the entire bottom of the steamer with parchment or foil, the steam wouldn’t be able to circulate to both layers.

Put the steamer over a wok with some simmering water in the bottom

or a stock pot that can hold your steaming rig. Cover the steamers

and let it go for about 12 to 15 minutes. The surface of the bao will get sort of glazed and opaque looking. It’ll be obvious when they're cooked.

And they will expand. Next time I make a full recipe (or when I reheat them), I’ll do only 5 per layer, and steam them in two batches. These were still a little bit of a b*tch to get out of the steamers. Not as bad as the Gi-MOJO bao from the first attempt, though ! Oh, and another warning. The bao in the bottom layer *will* rise up and hit the bottom of the top steamer tray. It’ll release OK (with a little residual in the slats, which will come out with a scrub), and the bao won’t rip too badly. They just won’t look as sexy as the ones in the top layer.
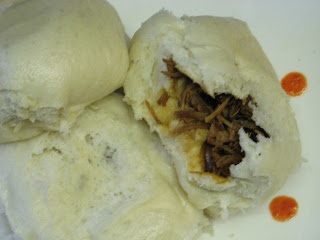
And there’s the money shot. I had them with some little dishes of dipping sauces; tamari (which is a type of soy sauce), Sriracha, and some commercial gyoza and “Soyaki” sauces (both from TJ’s….yeah, so???) on the side to dip them in. You could also offer some light vinegar, like rice-wine vinegar, or Chinese black vinegar for dipping.
The savory filling is a lovely contrast to the soft, pillowy, slightly sweet and sticky dough layer. Add in the extra punch from the dipping sauce(s), and it’s a great play of salty/sweet/savory tastes all at the same time. They’re a nice, light entrée along with some steamed or stir-fried veggies. And, obviously, as part of a dim sum feast (I frequently do an “Asian appetizer night” for dinner, the home version of dim sum), they’re essential.
These do freeze well, and just get steamed from frozen for about 10 minutes or so.
Really tasty and a great way to get rid of leftovers. Or leftover LEFTOVERS. Or even filling you make just for the event !
Try some bao. They’ll *wow* ya (get it….bao wow….? oh, I slay me……..)
Here’s the recipes for both the dough and a filling, in case you don’t have leftover pork roast layin’ around.
Bao Dough
Bao Dough
Makes 12 buns
Adapted from the “Sunset Oriental Cook Book” © 1984
1 package yeast (active dry or instant)
1 package yeast (active dry or instant)
1C warm water (about 110°F)
1/3C sugar
2 tablespoons salad oil
1 teaspoon salt
3&1/4 cups all purpose flour (approx.)
Dissolve yeast in water, blend in sugar, oil and salt. Let stand in warm place until bubbly, about 15 minutes. Add 3&1/4C flour and mix in stand mixer until dough holds together. Adjust dough with small amounts of flour or water as needed to get cohesive dough. Knead in stand mixer until dough is smooth and elastic, about 8 to 10 minutes. Place in oiled bowl, turn to oil all sides, cover and set aside for about 1&1/2 hours in a warm place, until dough is approximately doubled.
Turn dough out onto a lightly floured board and knead for about 1 minute. Shape into a log, and cut into equal halves. Cut each half into thirds, then each third into two pieces.
Roll each piece into a circle about 4&1/2 to 5 inches in diameter. Rotate or press between fingers to make edges slightly thinner than middle. Place about 2 tablespoons of filling in the middle of each dough round, and pull, pinch and pleat the dough edges up over the filling to completely cover it. Twist dough edges slightly, then roll ball on board, seam side down, cupping and gently pressing in with your fingers, to ensure a good seal.
Set each filled bun, seam side down, on a baking pan lined with parchment or a Silpat. When all buns are filled, cover the pan with a towel, and set aside in a warm place for about half an hour. The buns will rise slightly, and look puffy and light. Line a steamer with cabbage or lettuce leaves, or with pieces of parchment or foil, roughly the size of each bao, and place the filled buns on the liner. Set the steamer over gently boiling water in a wok or large pan. Cover and steam for 12 to 15 minutes, or until the bao look glazed and opaque. Serve warm, or let cool, wrap and freeze for up to four weeks. To reheat, steam frozen buns for about 10 minutes. Serve with various dipping sauces, to taste.
Pork Filling
For 12 bao
Adapted from the “Sunset Oriental Cook Book” © 1984
1&1/2 pounds lean boneless pork, cut into 1/2-inch cubes
1&1/2 pounds lean boneless pork, cut into 1/2-inch cubes
2 cloves garlic, minced or pressed
1/2 teaspoon grated fresh ginger
4 teaspoons sugar (divided use)
4 tablespoons soy sauce (divided use)
1 tablespoon cornstarch
1 tablespoon shaoxing rice wine (or dry sherry)
1/4 cup water
1 tablespoon vegetable oil
1 medium onion, chopped
Place pork, garlic, ginger, 2 teaspoons sugar and 2 tablespoons soy sauce in a bowl and mix. In another bowl, combine remaining sugar and soy sauce, cornstarch, wine and water. Set both aside.
Heat oil in wok or wide frying pan over high heat. Add pork mixture and stir-fry until browned, about 5 minutes. Add onion, and stir-fry until onion is soft, about 2 minutes. Stir cornstarch mixture and add to pan, cook, stirring until sauce boils and thickens. Let cool before stuffing bao.
If it's bread (or made with yeast), the cool place to be is Yeastspotting !
No comments:
Post a Comment