OK. If you celebrated Easter, you likely have leftover ham. LOTS of leftover ham. And by this point in the calendar, you're really, really tired of ham sandwiches. I have some ideas. Unfortunately, no pictures, because, well, *I* cooked my Easter ham on Wednesday, so I've only had ham sandwiches once, and this weekend I'll be dealing with the face-off with the leftovers. You guys are probably already into a smackdown mode with 'em.
So I offer a few suggestions.
First of all, don't toss that ham bone. If you're not wanting soup right now, or a pot of beans, wrap that sucker securely in plastic wrap, then foil, or...better yet, vacuum seal it, and toss it in the freezer. In September, when the weather chills, a pot of split pea soup, or Navy bean soup, or red beans and rice will fit the bill, and you'll have a hammy, meaty treasure stashed away to jump start that meal. And for goodness' sakes (literally), leave some meat on the bone. That'll REALLY give you hammy, meaty goodness in that soup or pot of beans.
Then, you can always freeze slices of ham, again, well wrapped in freezer bags, or vacuum bags, for when you want a quiche, or frittata, or pasta with ham sauce, or pizza topped with ham, or....whatever your imagination conjures up. Ham lends a smokey savoriness to so many things, it's always great to have a baggie or two of ham slices in the freezer.
For the short term, however, here are a couple of tried and true recipes I'll be making in the near future. In fact, I see the...
Friday, April 29, 2011
Thursday, April 28, 2011
My troubled relationship with leafy greens

Even as a child, I loved spinach (yeah, I was a weird kid). I loved it even more when I grew up and discovered mid-20th Century spinach salads. But then, what's not to love about a salad with a dressing made with hot bacon grease? That would make a pair of sweat socks taste good....
But the "hearty" greens ? Yeah. Not so much. Part of my hesitancy to embrace them was that I didn't grow up with them. Collards, kale, chard, mustard/turnip greens were not something that ever entered the culinary radar of my Mom's kitchen, so I wasn't exposed to them. I have vague memories of eating hearty greens cooked Indian-style, at restaurants, and when co-workers would bring in home-cooked food for me to sample. But they were never something I sought out on my own, or would ever dream about ordering in a restaurant. Actually, not 100% true...on a trip to Atlanta, we ate at a "traditional" Southern restaurant, and of course, collards were on the menu. I was...not impressed.
Tuesday, April 26, 2011
A Stroll Down Memory Lane

If you grew up in Southern California during the 50's and 60's, you have two very strong memories of local bakery operations which you fondly revisit to this day. Talk about "taste memories", these two companies built 'em deep and strong for us Boomer SoCal-ians.
One was the Helms Truck. Think of ice-cream trucks, only with baked goods. Back in the day, you put a sign in your window, and the Helms truck stopped and Mom ran out to buy bread, doughnuts, cookies, rolls, whatever. Or you, as the snot-nosed kid, ran out when you heard the "TOOOT-TOOOT" whistle, and watched in awe as the uniformed Helms Man, who also wore a tie and a jaunty hat, (much like a police officer's dress hat), pulled out drawer after wooden drawer filled to the brim with cookies and doughnuts and brownies and jelly rolls and Danishes and other delights, all lined up like sugary soldiers in neat rows. To me, those drawers were magic. I can see them still in my mind's eye. The wood working on them was stunning. Highly varnished, with dove-tailed joints, and lined with parchment, they stretched the width of the truck, and slid out, smoothly and soundlessly, from the back. It was absolute nirvana for a kid. A bakery on wheels ! At your door ! What could possibly be better?
Sadly, as times and consumer habits changed, along with the milkman, the Helms Man passed into memory. Delivery service stopped in 1969, and Helms products were never offered in supermarkets. So, when delivery service stopped, Helms sadly faded into the ether of nostalgia and childhood memories.
The other local baked goods icon still exists in a limited form; at least it's brand name does. Van de Kamp's Holland Dutch Bakery. Their logo was, of course, a windmill, and it was bright blue, on white packaging. These products WERE sold in supermarkets, and back in the day they had Van de Kamp's Ladies in the stores, who were sort of what we'd call "brand ambassadors" today. I think they stocked the display shelves, and answered questions about the products. The ladies wore starched, white pinafores over bright blue dresses, and they had prim, starched white lace hats. They all looked like your Aunt Helen.
Thursday, April 21, 2011
Cinnamon-Chocolate Chip-Sour Cream Coffee Cake
OK, doesn't that title just say it all?
Seriously. What could possibly be wrong with the combination of *sour cream*, *chocolate chips* and *cinnamon*? Add in a pretty copious amount of both butter and sugar, and you know you're going somewhere wonderful.
I'm not a huge breakfast eater. Never have been. And now, I'm not working, so I don't get up at the crack of dawn any longer. OK. Confession time. I never really *did* get up at the crack of dawn (a morning person, I most certainly am not....), but I do get to sleep later now than I used to. But a couple of hours or so after I've gotten up, I do want a little "sumthin' sumthin'" in my tummy, and when I was working, I'd gotten into the habit of baking up some "breakie-type" goodies on the weekend for me to have with my coffee and my morning medications. A little cushion in the tum-tum as it were. I still try to do that about once a week or so (scones, coffee cakes, that sort of thing), and what I don't eat, I can share.
I found this recipe somewhere on the Webs, and just doing a Google search now, it led me back to one of my favorite blogs "Smitten Kitchen" (see the list of links to the right). Somehow that doesn't surprise me. Smitten Kitchen's food always seems like it's straight out of my kitchen. I can't see much difference between the cake I made, and the recipe that was originally published on "Smitten Kitchen", so I'll just give all the credit there, and not even say it was adapted. Other than maybe I'll give you some comments on what I did a bit differently....
If you haven't been over to "Smitten Kitchen", and you like to cook (and eat) you should check it out.
Anyway, this cake is a marvel. Rich (obviously) but still sort of tart and tangy from the sour cream, and spicy from the cinnamon, and surprisingly, not overtly sweet. At least not cloyingly so. And rich, so satisfyingly rich. And moist, it just melts when you put it in your mouth. And stays moist for several days under plastic wrap at room temperature, which is always welcome. There's nothing worse than dried out baked goods...
Cinnamon-Chocolate Chip-Sour Cream Coffee Cake
From Smitten Kitchen
(makes one 9x13", very rich, cake)
3C all purpose flour
1 tsp. baking powder
1&1/2 tsp. baking soda
1/2 tsp. salt
1 stick unsalted butter, softened
1&1/2C sugar
3 eggs, separated
1&1/2 tsp. vanilla extract
16 oz. sour cream
Filling/Topping:
12 oz. chocolate chips
1/2C sugar, mixed with 1 tsp. cinnamon powder
Preheat oven to 350°. Grease and flour a 9x13-inch pan. I also laid a piece of parchment on the bottom, and greased that as well, just to be sure that the cake would eventually release (don't ask my why I'm paranoid about that......).
Sift together the flour, soda, powder and salt, and set aside. The best way to do that is in a sieve, set over a bowl. Note...use a larger sieve than I did, I made a helluva mess sifting the dry stuff into the bowl. It's a volume thing I have, I always use a vessel way smaller than I need.....
Here's the sifting rig:

Yeah, that sieve's a bit small.....
Separate your eggs (we all know how to do that, but hey, here's a gratuitous egg-separation picture),

Normally, I do the separation thing by running the egg back and forth between the broken shells, but I was low on eggs, and couldn't afford to muck one up, so I went to the "egg separating for dummies" method with the device. Whites in one bowl, yolks in another....

Set the yolks aside. By the way....see the difference in the color of the yolks? The pale one's from Trader Joe's, which had been my previous gold standard. The darker ones are from my CSA. Guess what....? Free-range, really fresh eggs have FLAVOR. Who knew?
Anyway, whip the whites into stiff peaks and set aside:

Cream the butter and sugar until light and fluffy. Add the yolks and vanilla, and beat until well-incorporated. Gently mix in half of the sour cream, then half of the flour, scraping down the sides and bottom of the bowl as needed. Here's the action shot of the butter creaming....ewwwww....ahhhhhh:

Then repeat with the remaining half of the sour cream and half of the flour mixture. Be careful not to over mix. At this point, the batter becomes a bit heavy, but not to worry. I switched to a large silicone spatula rather than the KitchenAid to get the rest of the work done, just to be sure I didn't over-work the mix.
Once the flour and sour cream is fully incorporated, fold in about 1/3 of the whipped egg whites to lighten the batter. Again, be careful to just incorporate them, and not over-mix. Once that's accomplished, fold in the balance of the egg whites, again, just until they're incorporated.
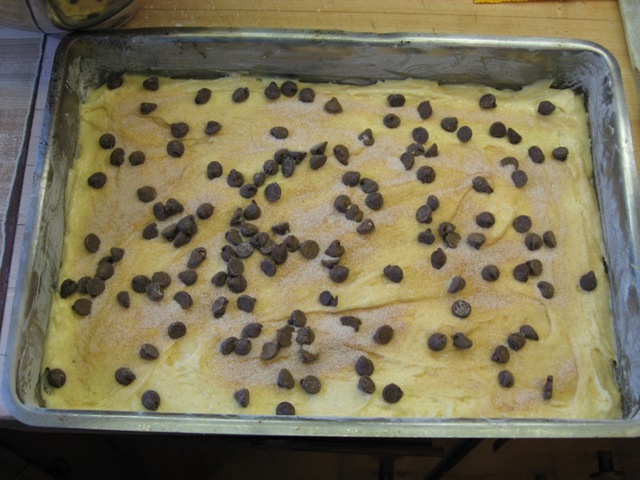
Spread half of the batter into your prepared pan. Sprinkle on half of the chocolate chips and half of the cinnamon/sugar mixture. Should look somethin' like this:

You will need to work the batter into the corners of the pan. It's very thick and stiff (at least mine was), and will not flow on its own.
Then *carefully* spread the rest of the batter over the top of the filling, and spread to the corners/edges. You'll need to finesse this. Again, my batter was stiff and thick, and seemed barely enough to cover. Not to worry. It'll work. Then take the last half of the chocolate chips and cinnamon sugar mix and top off the cake. Like so:


Seriously. What could possibly be wrong with the combination of *sour cream*, *chocolate chips* and *cinnamon*? Add in a pretty copious amount of both butter and sugar, and you know you're going somewhere wonderful.
I'm not a huge breakfast eater. Never have been. And now, I'm not working, so I don't get up at the crack of dawn any longer. OK. Confession time. I never really *did* get up at the crack of dawn (a morning person, I most certainly am not....), but I do get to sleep later now than I used to. But a couple of hours or so after I've gotten up, I do want a little "sumthin' sumthin'" in my tummy, and when I was working, I'd gotten into the habit of baking up some "breakie-type" goodies on the weekend for me to have with my coffee and my morning medications. A little cushion in the tum-tum as it were. I still try to do that about once a week or so (scones, coffee cakes, that sort of thing), and what I don't eat, I can share.
I found this recipe somewhere on the Webs, and just doing a Google search now, it led me back to one of my favorite blogs "Smitten Kitchen" (see the list of links to the right). Somehow that doesn't surprise me. Smitten Kitchen's food always seems like it's straight out of my kitchen. I can't see much difference between the cake I made, and the recipe that was originally published on "Smitten Kitchen", so I'll just give all the credit there, and not even say it was adapted. Other than maybe I'll give you some comments on what I did a bit differently....
If you haven't been over to "Smitten Kitchen", and you like to cook (and eat) you should check it out.
Anyway, this cake is a marvel. Rich (obviously) but still sort of tart and tangy from the sour cream, and spicy from the cinnamon, and surprisingly, not overtly sweet. At least not cloyingly so. And rich, so satisfyingly rich. And moist, it just melts when you put it in your mouth. And stays moist for several days under plastic wrap at room temperature, which is always welcome. There's nothing worse than dried out baked goods...
Cinnamon-Chocolate Chip-Sour Cream Coffee Cake
From Smitten Kitchen
(makes one 9x13", very rich, cake)
3C all purpose flour
1 tsp. baking powder
1&1/2 tsp. baking soda
1/2 tsp. salt
1 stick unsalted butter, softened
1&1/2C sugar
3 eggs, separated
1&1/2 tsp. vanilla extract
16 oz. sour cream
Filling/Topping:
12 oz. chocolate chips
1/2C sugar, mixed with 1 tsp. cinnamon powder
Preheat oven to 350°. Grease and flour a 9x13-inch pan. I also laid a piece of parchment on the bottom, and greased that as well, just to be sure that the cake would eventually release (don't ask my why I'm paranoid about that......).
Sift together the flour, soda, powder and salt, and set aside. The best way to do that is in a sieve, set over a bowl. Note...use a larger sieve than I did, I made a helluva mess sifting the dry stuff into the bowl. It's a volume thing I have, I always use a vessel way smaller than I need.....
Here's the sifting rig:

Yeah, that sieve's a bit small.....
Separate your eggs (we all know how to do that, but hey, here's a gratuitous egg-separation picture),

Normally, I do the separation thing by running the egg back and forth between the broken shells, but I was low on eggs, and couldn't afford to muck one up, so I went to the "egg separating for dummies" method with the device. Whites in one bowl, yolks in another....

Set the yolks aside. By the way....see the difference in the color of the yolks? The pale one's from Trader Joe's, which had been my previous gold standard. The darker ones are from my CSA. Guess what....? Free-range, really fresh eggs have FLAVOR. Who knew?
Anyway, whip the whites into stiff peaks and set aside:

Cream the butter and sugar until light and fluffy. Add the yolks and vanilla, and beat until well-incorporated. Gently mix in half of the sour cream, then half of the flour, scraping down the sides and bottom of the bowl as needed. Here's the action shot of the butter creaming....ewwwww....ahhhhhh:

Then repeat with the remaining half of the sour cream and half of the flour mixture. Be careful not to over mix. At this point, the batter becomes a bit heavy, but not to worry. I switched to a large silicone spatula rather than the KitchenAid to get the rest of the work done, just to be sure I didn't over-work the mix.
Once the flour and sour cream is fully incorporated, fold in about 1/3 of the whipped egg whites to lighten the batter. Again, be careful to just incorporate them, and not over-mix. Once that's accomplished, fold in the balance of the egg whites, again, just until they're incorporated.
Spread half of the batter into your prepared pan. Sprinkle on half of the chocolate chips and half of the cinnamon/sugar mixture. Should look somethin' like this:
You will need to work the batter into the corners of the pan. It's very thick and stiff (at least mine was), and will not flow on its own.
Then *carefully* spread the rest of the batter over the top of the filling, and spread to the corners/edges. You'll need to finesse this. Again, my batter was stiff and thick, and seemed barely enough to cover. Not to worry. It'll work. Then take the last half of the chocolate chips and cinnamon sugar mix and top off the cake. Like so:
Slide into your preheated oven and bake for 40-50 minutes (check after 40, mine was done then), or until a tester comes out clean. Cool on a rack slightly (or to room temperature) before serving. Lasts several days, wrapped well in plastic wrap.
Next time, I'd use the full 12 ounces of chocolate chips. Some of the reviews I'd read said that was too much. Um...no. It wouldn't have been. As you can see from the pics, that's actually a bit scanty on both of the layers. Use the full 12 ounces. You won't regret it.
Here's the done deal:

Man oh man, was that good. I gave about a third of it to a neighbor who'd done me a favor, and a big chunk of the rest to a friend, but I sure didn't have a problem snarfing up the balance. One other note...I'd make it in maybe an 11x7-inch pan next time, instead of the 13x9. Might have been easier to spread out that batter.
Wednesday, April 20, 2011
Ahhhhh.....so much food, so little time....
I see from the "stats" page on my dashboard that I actually have PEOPLE reading this. Thank you all ! I can't tell you how much that pleases me, and gives me the "ooommmphhh" to keep going ! Yay us.
And I owe you some new material. And I've been BUSY in the little kitchen. There's been an OUTRAGEOUS sour cream/chocolate chip/cinnamon coffee cake that was just heaven in my mouth; quite decadent. There was some really good stuffed chard leaves (chard ! Who knew it was so good. Thanks again to my CSA), which mimicked dolmades. And that brings up the whole topic of my CSA, which rocks. There was an off-the-hook roast beef dinner tonight, with a potato/Parmesan gallete (swoon) and steamed turnips and loads of leftovers (a whole other topic). And there was another off-the cuff, "I've got this, what can I find/get/buy to go with that" dinner.
Whew ! Darn near wore myself out just describing the last week or so. And now Easter weekend's here, and on Saturday I'm making an early birthday dinner for one of my dearest friends, which of course, will be fodder for sharing with all y'all. It'll include a pretty spectacular yeasted-dough cake that is one of my (and my friend's) fondest childhood memories. *That'll* be a whole OTHER post !
I'll see if I can get one other small thing up tonight before I crash and burn. I hate those blogs I get addicted to, then wait for 2 or 3 weeks before a new post goes up. I sort of feel, if you're going to commit to blogging, well then, commit to blogging for heaven's sake !
In the interim, I leave you with the two prettiest, sweetest faces I know of....

The white Bichon is Rosie. She's A Princess, and she'd be the first to remind you she is. Very regal, and she's the prissy "good girl". She'll have her 5th anniversary with me in July. I think she's around 7 or so, (no more than 2 when I got her) and I think she's pure Bichon. Maybe not show-worthy, but I don't think she's mixed with much of anything else. The gray ghost is Lulu. She'll have her 3rd anniversary with me in September. The shelter told me she was a poodle....ummmm, not so much. I've *had* a miniature poodle, and Lulu ain't one. She's a mix of....*I* think Shi Tzu (from what I've been able to find, her personality and body build is mostly that), and maybe terrier?? Maybe....chihuahua? Maybe dachshund? Maybe....? I think Lulu's probably about 3 now, and was about 6 months when I got her. Lulu is most certainly NOT A Princess. She's my Goober. Silly, stubborn and ohhhh, so willful. But she's just goofy sweet, and gives the best sloppy kisses.
Of course, they're both rescues, and both were strays, so who knows what they are and how old they are? But their personalities and physical traits fit Bichon and Shi Tzu. And when Rosie's fresh from the groomer, she could be in the center ring at Westminster !
Again I say, please. Look at those faces, and if you are thinking you want to have a household pet, please adopt from your local shelter. Both Rosie and Lulu were "throw-away" animals, and that just hurts my heart. There are so many wonderful souls out there just waiting for their "forever" homes, where they'll be loved, and safe, and warm and fed (yes, they both had some good roast beef nummies tonight....) and secure. They'll give you a thousand times that back in return.
Dog or cat, it doesn't matter. Go to your shelter and get your next best friend.
And when you bring them home, please, spay or neuter them. There are far, far too many homeless pets, and unfortunately, in most cases we know how that ends.
Save a life....adopt a pet. Rosie and Lulu say "Thanks and *slurrrrps*". And I say "bless you, and so will St. Francis".
Tuesday, April 19, 2011
Saving that yeast, or bread au natural
After I fully and whole-heartedly committed to bread baking, the next challenge I wanted to conquer was "natural" sourdough. No added, commercial yeast, just whatever happens to hit from the air around the kitchen.
I love, love, LOVE sourdough bread. The tang, the crust, the chew. Just wonderful. Of course (and I know there will be debate....) the best is from San Francisco. Those little yeastie bugs up there are special.
Still, I wanted to give it a try down here in SoCal. But all the methods I'd seen just seemed so....wasteful. I'm single, and even though I'm a bread freak, it's all I can do to eat a loaf of homemade bread before it gets so stale even the scavenger pigeons outside don't want it. And as I said, all the sourdough starter methods I'd found had you either using commercial yeast as a "helper" or discarding up to half your starter each time you refreshed it. That just seemed wrong to me. Plus the quantities involved were HUGE. HUGE. I'd have had to have cleared out my entire refrigerator to accommodate the starter.
Late last year, on a most wonderful website called "Serious Eats", there was a tutorial on sourdough starters, how to well, start them, cultivate them, use them and store them that seemed not only reasonable in terms of quantity, but pretty darned easy in terms of effort.
So I took the plunge, and started....(drum roll please)....."The B*tch". (A sly, or not, homage to Anthony Bourdain in "Kitchen Confidential"). I started my starter (hmmmm, start the starter....grammar, much?) in December, and she's still alive and thriving. She takes a little nap, now, pretty much all the time in my fridge, in a nice, sealed 32-ounce jar. Once a month (and I have a reminder in my Outlook task list), she gets pulled out and fed. Sometimes I use some for a loaf, sometimes she just gets warmed up, fed and sent back to cold storage. But she keeps workin'.
Last weekend was feeding time in the little kitchen. So while I had The B*tch pulled out, I decided to not only pull some starter for a pizza crust to stash in the freezer (always a good thing to have on hand), but also to make a loaf of bread.
Here's the starter in her little jar:

All nice and bubbly and active. She'd been fed the day before I harvested some for the crust and the bread, and left to sit overnight.
Here's the preferment after an overnight rest (starter plus some new flour and water):

Again, nice and bubbly and active. And, remember, there's ZERO commercial yeast in here. Just starter, that *started* (there's that pesty grammar again....) out with nothing more than flour and water. Just amazes me every time I do this.
So, you mix your preferment (rested overnight) with more flour (I used bread flour, the starter is usually all purpose) and water, a bit of olive oil and some salt, and knead until it's happy. About 10 minutes in my KitchenAid. Then you form it into a ball, and tuck it into an oiled food storage bag. Tuck that into the fridge again overnight.
That's the only downside about the whole sourdough experience. It does take some forethought....
After it's rested for a night (or 2) in the fridge, it's time to make bread (or for pizza crust, to toss into the freezer for future use). Pull it out of the zippy bag, and form into a ball. It'll look something like this...

before you take it out of the bag. It grew ! And this....

after you dump it out. Form it into a ball. The best way to do that is to take your hands (floured lightly) and cup them around the edges of the dough. Push lightly with the underside (pinkie side) of each hand in to the center of the dough, as you rotate it around, forming a ball. A lightly floured counter helps. After you've got a nice, fairly tight ball shape, turn it over, and pinch the edges of the bottom seam together, like this:

Then flip it over again, seam down, and repeat the cupping, rotating, pressure motion to ensure that seam will stay sealed. Put it onto a baker's peel, or a flat sheet pan (or the back of a rimmed baking sheet) that has been dusted with corn meal, and let the dough rise until it's doubled. Right before it goes into the oven, slash the top with a sharp knife or a single-edged razor blade.
Then slide it into a very well preheated 450° oven, onto a preheated baking stone if you have one. If not, preheat another flat cookie sheet, or an inverted sheet pan, and slide the bread onto that. The stone or the baking sheet should be on the middle rack. Pour some hot water into another pan you've put on the bottom shelf of the oven, and close the door quickly. Bake for about 30-40 minutes, or until the crust is nice and brown and the internal temperature of the loaf is around 200° (and it sounds "hollow" when thumped on the bottom).
Remove from the oven, and cool on a rack before tearing it open, slathering on that sweet butter and fleur de sel and enjoying.
Here's the baked loaf:

And the sliced bread, to see that lovely crumb and rise, all with, remember now.....NO COMMERCIAL YEAST!

Pretty cool, huh?
Here's the LINK to the cool, multi-step tutorial on "Serious Eats" which will take you to all the other steps in the process, as well as the original bread recipe.
And here's the link to Cookistry, which is the tutorial author's (her name is Donna Currie) own, most excellent and informative blog. I think you'll enjoy that blog as much as I do.
Sourdough. It's one of Nature's miracles.
Saturday, April 16, 2011
A "Welcome Spring" dinner and a myth debunked
Spring has hit Southern California with the force of a sledge hammer. Actually, maybe Summer has. *This* was the ambient temperature on top of the exhaust hood over my stove in the thick of making this dinner:

Granted, at that point I was preheating a cast iron grill pan, had a big saute pan running, and had just turned off the oven from baking bread, but still.....
Downtown LA today hit a record of 91°. While I'm about 30 miles south, and towards the coast, of LA, it was still plenty warm where I was. I actually almost thought about doing part of tonight's dinner (well, all but the bread, actually) on the Weber Kettle, but I haven't gotten it grill-ready for the season yet.
So the little (hot) kitchen it was.
When I was in the grocery store earlier in the week, I did espy, with my little eye, some lovely loin lamb chops. I realized I hadn't had lamb chops in a long, long, LOONNNNG time, and I do loves me some nicely cooked lamb. So I snagged the package. Here they would be:

Beautiful little gems, aren't they? I figured if I couldn't eat all three of them, there were some scavengers in fur suits that would be more than willing to help me out *grin/wink* . I browsed through some cookbooks in my collection, and settled upon a rub from Jacques Pepin's "Fast Food My Way"....equal parts ground cumin, paprika, salt and freshly ground pepper. I rubbed that into each side of the chops, and stashed them back in the fridge for an hour or so. I used sweet, smoked Spanish paprika (pimenton dulce), since I figured the smokiness would go well with the smokiness of the ground cumin. It did.
When the chops had sat for about an hour in the fridge, with the rub, I pulled them out, and started to heat my grill pan. I use a small, Le Creuset that only needs to be over one burner. Works for a singleton. Especially since I have a "high power" burner on my stove. I usually let it preheat for 10-15 minutes while I'm prepping the rest of the meal.


Flop the chops onto the hot grill pan, and I let it go for 3&1/2 minutes on the first side. They're crowded in a bit to be sure they're over the hottest spot. Then turn.

Those be some nice "grill" marks !
Another 3&1/2 minutes, and SHAZAM; perfectly cooked lamb chops.

And pretty darned tasty too. Lamb, of course, just speaks to Spring, even though it's pretty much available year 'round these days. That rub was just perfect, it mimicked the "smoke" you'd get from actually grilling outdoors, and the grill pan is one of my favorite techniques. It's just so much less of a hassle than lighting the charcoal, and letting them burn to ash, then getting the grill hot, then banking the coals, then running in and out to futz with the meat...
For some dishes (Santa Maria-style tri-tip for instance), outdoor grilling is totally essential. For small, thin pieces of meat, the grill pan is my go to. So I'm a heathen !
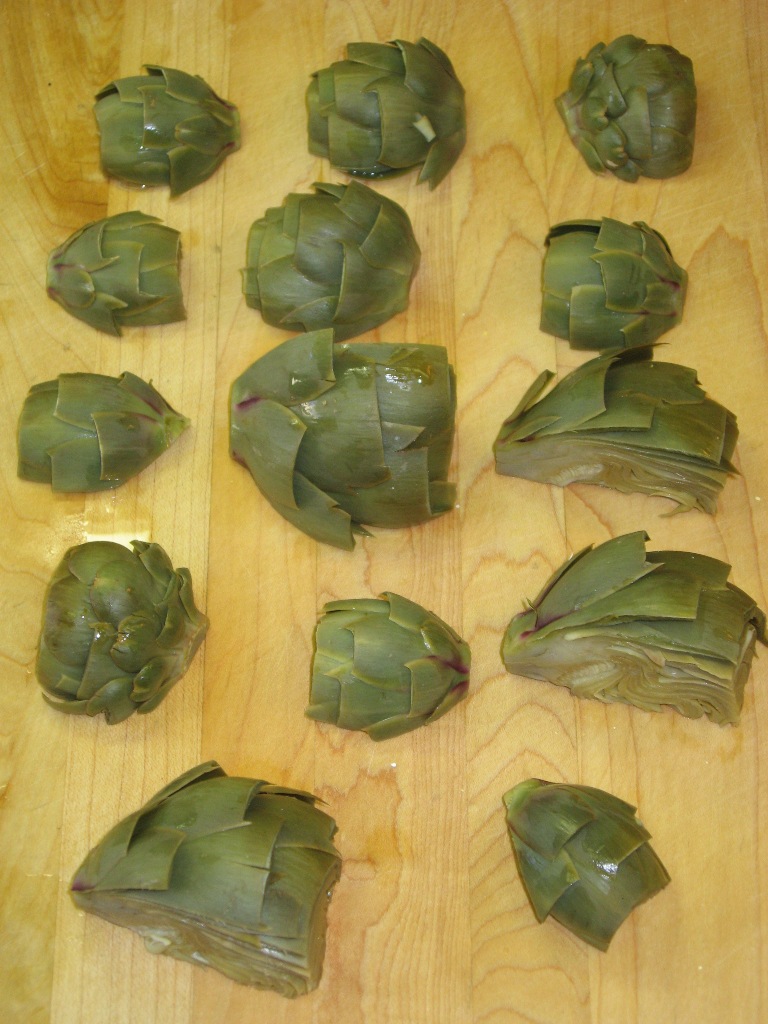
Along with, I had some absolutely stunning baby artichokes from my CSA:

I should've put a coin in there for scale....the "large" one on the left was probably only about 2&1/2 inches in diameter. Some of the smaller ones were about the size of my thumb. But they still had plenty sharp thorns ! (Don't ask me how I know....). I knew I didn't want to boil/steam them to death, so I figured I'd do a take on Italian sauteed artichoke hearts. I again browsed through some cook books, and found a couple of recipes that suggested just to cut the itty-bitty 'chokes in halves or quarters, rub with lemon and saute away. In the back of my mind, it seems I'd; a) tried that before with a major fail and b) had that same dish in a restaurant as a major fail (tough, chewy, spiky, stringy outer leaves). One recipe said to par-boil the babies first, so that was what I did, after trimming them down and cutting in halves and quarters.
After boiling (and shocking in ice water):

Then I put some olive oil in a pan, tossed in some lemon slices and a sliced clove of garlic (I'd also put lemon and garlic in the water when the 'chokes were boiling, I think lemon and garlic are just a must for artichokes...), and tossed them in to saute while the chops were grilling.

That should give some idea of scale. The caramelized lemon slices at the top as compared to the tiny 'chokes. And that was a *really* small lemon...and the garlic as well. A normal size garlic clove. TINY artichokes.
Nice and brown and toasty:

Artichokes, too, to me, especially these very small ones, just announce Spring. They look great, don't they? Yep, and therein lies the myth that I'm about to debunk....
This is probably the 5th or 6th time I've tried to make this dish. Each time, the recipes have told me just to trim the baby artichokes as you would if you were going to steam their larger siblings. No cutting down to the tender leaves. No scraping out the stems. No discarding anything but the thorny tops and the very tip of the "crown" of leaves.
Lies. All lies. Those outer leaves never, ever get tender. Ever. After about 8 minutes in rapidly boiling water (cut into quarters and halves, not whole), these very small, very new, very fresh artichokes were tender as a baby's butt. At least the stem end was, and the heart, and that was what I judged it by. But you put those bad boys into a saute pan with hot oil, and those outer leaves, and even the next few layers of inner leaves, seize right up into an inedible mass of I'm-not-sure-what. Balsa wood comes to mind as an approximation of the texture.
The inner leaves.....fabulous. The hearts.......amazingly, meltingly tender. Because they were so fresh, and so young, they were almost sweet, 'though they still had that deep, vegital, green taste that is characteristic of artichokes. No choke, no hair, no fuzz. But the outer leaves...about 4 layers worth....? Peeled right off after the first unfortunate mouthful and tossed into the discard pile. Maybe a slight nibble from the base, but really not worth the effort.
Served with another batch of this...

...though, honestly, even Balsa wood would taste good with this. Next time, I'll just serve the homemade mayonnaise with a straw.
*MENTAL NOTE* when you want sauteed baby artichokes, peel OFF the outer several layers of leaves and then throw them in the saute pan. I'm really, really glad I didn't just saute them. I think *those* would have been entirely inedible.
But overall, a very nice "Welcome Spring" meal. Bread details to come later...(it was a good, natural sourdough).
If YOU'VE had success with the sauteed artichoke method, please comment. I still really want to nail this, because in my head, it sounds like an absolute marvel of a dish. On my plate, eh, never quite gotten there. Even in restaurants.

Granted, at that point I was preheating a cast iron grill pan, had a big saute pan running, and had just turned off the oven from baking bread, but still.....
Downtown LA today hit a record of 91°. While I'm about 30 miles south, and towards the coast, of LA, it was still plenty warm where I was. I actually almost thought about doing part of tonight's dinner (well, all but the bread, actually) on the Weber Kettle, but I haven't gotten it grill-ready for the season yet.
So the little (hot) kitchen it was.
When I was in the grocery store earlier in the week, I did espy, with my little eye, some lovely loin lamb chops. I realized I hadn't had lamb chops in a long, long, LOONNNNG time, and I do loves me some nicely cooked lamb. So I snagged the package. Here they would be:

Beautiful little gems, aren't they? I figured if I couldn't eat all three of them, there were some scavengers in fur suits that would be more than willing to help me out *grin/wink* . I browsed through some cookbooks in my collection, and settled upon a rub from Jacques Pepin's "Fast Food My Way"....equal parts ground cumin, paprika, salt and freshly ground pepper. I rubbed that into each side of the chops, and stashed them back in the fridge for an hour or so. I used sweet, smoked Spanish paprika (pimenton dulce), since I figured the smokiness would go well with the smokiness of the ground cumin. It did.
When the chops had sat for about an hour in the fridge, with the rub, I pulled them out, and started to heat my grill pan. I use a small, Le Creuset that only needs to be over one burner. Works for a singleton. Especially since I have a "high power" burner on my stove. I usually let it preheat for 10-15 minutes while I'm prepping the rest of the meal.

Make sure you do have a good, externally vented exhaust fan if you use one of these babies. Or....open all the windows, turn on all the fans, and disconnect the smoke alarms !
I sprinkled a bit more of the rub over both sides of the chops, and then followed Jacques' most excellent suggestion...pour a little olive oil in a shallow plate, and put the chops on the oil (he actually used a baking sheet, but his chops were broiled). Press down a bit to be sure that the entire surface contacts the oil, then flip and repeat ! GEE-nious ! Usually I brush oil on the surface of the grill pan, which spitters and spatters and pops and smokes and makes a mess, and STILL doesn't get oil where I want it. Much, much better method.

Flop the chops onto the hot grill pan, and I let it go for 3&1/2 minutes on the first side. They're crowded in a bit to be sure they're over the hottest spot. Then turn.

Those be some nice "grill" marks !
Another 3&1/2 minutes, and SHAZAM; perfectly cooked lamb chops.

And pretty darned tasty too. Lamb, of course, just speaks to Spring, even though it's pretty much available year 'round these days. That rub was just perfect, it mimicked the "smoke" you'd get from actually grilling outdoors, and the grill pan is one of my favorite techniques. It's just so much less of a hassle than lighting the charcoal, and letting them burn to ash, then getting the grill hot, then banking the coals, then running in and out to futz with the meat...
For some dishes (Santa Maria-style tri-tip for instance), outdoor grilling is totally essential. For small, thin pieces of meat, the grill pan is my go to. So I'm a heathen !
Along with, I had some absolutely stunning baby artichokes from my CSA:

I should've put a coin in there for scale....the "large" one on the left was probably only about 2&1/2 inches in diameter. Some of the smaller ones were about the size of my thumb. But they still had plenty sharp thorns ! (Don't ask me how I know....). I knew I didn't want to boil/steam them to death, so I figured I'd do a take on Italian sauteed artichoke hearts. I again browsed through some cook books, and found a couple of recipes that suggested just to cut the itty-bitty 'chokes in halves or quarters, rub with lemon and saute away. In the back of my mind, it seems I'd; a) tried that before with a major fail and b) had that same dish in a restaurant as a major fail (tough, chewy, spiky, stringy outer leaves). One recipe said to par-boil the babies first, so that was what I did, after trimming them down and cutting in halves and quarters.
After boiling (and shocking in ice water):
Then I put some olive oil in a pan, tossed in some lemon slices and a sliced clove of garlic (I'd also put lemon and garlic in the water when the 'chokes were boiling, I think lemon and garlic are just a must for artichokes...), and tossed them in to saute while the chops were grilling.

That should give some idea of scale. The caramelized lemon slices at the top as compared to the tiny 'chokes. And that was a *really* small lemon...and the garlic as well. A normal size garlic clove. TINY artichokes.
Nice and brown and toasty:

Artichokes, too, to me, especially these very small ones, just announce Spring. They look great, don't they? Yep, and therein lies the myth that I'm about to debunk....
This is probably the 5th or 6th time I've tried to make this dish. Each time, the recipes have told me just to trim the baby artichokes as you would if you were going to steam their larger siblings. No cutting down to the tender leaves. No scraping out the stems. No discarding anything but the thorny tops and the very tip of the "crown" of leaves.
Lies. All lies. Those outer leaves never, ever get tender. Ever. After about 8 minutes in rapidly boiling water (cut into quarters and halves, not whole), these very small, very new, very fresh artichokes were tender as a baby's butt. At least the stem end was, and the heart, and that was what I judged it by. But you put those bad boys into a saute pan with hot oil, and those outer leaves, and even the next few layers of inner leaves, seize right up into an inedible mass of I'm-not-sure-what. Balsa wood comes to mind as an approximation of the texture.
The inner leaves.....fabulous. The hearts.......amazingly, meltingly tender. Because they were so fresh, and so young, they were almost sweet, 'though they still had that deep, vegital, green taste that is characteristic of artichokes. No choke, no hair, no fuzz. But the outer leaves...about 4 layers worth....? Peeled right off after the first unfortunate mouthful and tossed into the discard pile. Maybe a slight nibble from the base, but really not worth the effort.
Served with another batch of this...

...though, honestly, even Balsa wood would taste good with this. Next time, I'll just serve the homemade mayonnaise with a straw.
*MENTAL NOTE* when you want sauteed baby artichokes, peel OFF the outer several layers of leaves and then throw them in the saute pan. I'm really, really glad I didn't just saute them. I think *those* would have been entirely inedible.
But overall, a very nice "Welcome Spring" meal. Bread details to come later...(it was a good, natural sourdough).
If YOU'VE had success with the sauteed artichoke method, please comment. I still really want to nail this, because in my head, it sounds like an absolute marvel of a dish. On my plate, eh, never quite gotten there. Even in restaurants.
Wednesday, April 13, 2011
Serendipity is a good thing
One day last week I had a beautiful episode of kitchen serendipity. The day before, while rooting around in my freezer, looking for SOMETHING ELSE, I found a package of what I believed was beef of some ilk. It was, of course, unlabeled. Even though I’ve been trying to be very, very consistent about labeling things in my freezer, *and* keeping an inventory list (with dates the stuff went INTO the deep-freeze, ooooh-ahhhh), so I don’t get unpleasant surprises later and end up throwing away what had been good food, this baggie had somehow slipped through the cracks. It was starting to look a bit frost worn, so in addition to what I was actually after (a pound of hamburger, which I found, by the way), I pulled out the mystery-meat-probably-beef baggie and tossed it in the ‘fridge to thaw.
I’ve already told you that I’m not a hugely intuitive cook, nor am I the most creative person on the planet, so my meals are not usually made by “winging it”. I’d never make it on “Iron Chef” or “Chopped”. I am hugely appreciative (and envious) of those cooks who can look at tapioca, liver, snicker doodles and cilantro and come up with a main dish. Me? Give me a recipe (and even better, a menu) and I’m ready to go. Usually, I plan my menus out the day before I go shopping for the week or so. I pull recipes from stuff I’ve clipped, found on the Interwebs or remember fondly, and check to make sure I have what I need. Then I think of sides to go with the main. Then I make my shopping list. Lately, that’s been challenged a bit by my having joined a CSA (community supported agriculture group, sort of like a food co-op). Since I never know what produce I’m getting every two weeks until I actually pick up my share, menu-planning’s become a bit more off-the-cuff. But I still like to have some sort of road map about where I’m going for each shopping trip.
Since I’m single, I also have to deal with the blessing (or curse) of leftovers. I actually, most certainly, do NOT love leftovers. Especially if I can’t “repurpose” the food into something different. Once I’ve had lasagna, I don’t want it again for another several months. Once I’ve had chili, I don’t want it again for a long while. It was easier when I was working….I didn’t have a problem eating leftovers for lunch, even exactly the same iteration of the food (weird, huh?). But serve it again for a dinner in the same near-time frame? Not gunna happen. No problem with taking a roast chicken and turning it into chicken salad, or enchiladas, or stir-fry. But beef stew twice in a week….not so much. That’s part of why the freezer labeling is critical ! Each plastic bin of “reddish stuff” sort of looks like the next.
So I also try to plan my menus around my leftover aversions. And I’m a pro at cutting recipes down to make only one or two servings. So if I need a pound of chicken breasts for a recipe to serve 4, and I know I’m only going to use half that pound for just me, I try to find another recipe for chicken that I can make in the same week (or shortly thereafter) to utilize the balance. Long story short, impossible at this point, I know, I usually work to a menu list and a fairly set plan of what I’m having for dinner over the course of a week or two between major grocery hauls.
So, the day after I discovered the mystery-meat-probably-beef-of-some-ilk package, I was trying to pull dinner together, and nothing that I had pulled recipes for sounded like what I wanted. By now, the mystery-meat package had defrosted enough for me to realize it was a three smallish pieces from a package tri-tip steaks I’d bought a while back and not used. SCORE ! That sounded like what I wanted. I also realized I had a HUGE, about soft-ball sized artichoke (one of the first of the season, yay) in the crisper that was really needing to be used. Hmmmmm….sounds like dinner to me. Seared tri-tip steaks, steamed artichoke with garlic mayo and the focaccia I’d wanted to make for months (see the previous post).
So I decided to sprinkle the steaks with a bit of Cajun seasoning mix, and “grill” them off on my stove-top Le Creuset grill pan. I figured about 2 minutes per side would be fine. I let the steaks sit a bit with the seasoning on both sides while everything else got ready. Trimmed and cleaned the ‘choke, and dealt with all the bread prep. Put the ‘choke on to cook, and about that time the bread came out of the oven. Almost time for lift-off…
I was about to tart up the Best Foods mayo like I normally do for my artichokes (Best Foods, lemon juice, Italian herbs and garlic) when I thought….”you know, I’ve got a bit of time before the steaks need to go on, I think I’ll try to make homemade mayonnaise”. Now, I’d tried to make mayonnaise a couple of times before. Never worked. I think because I was making a small quantity, and trying to do it in a large Cuisinart, the friction from the spinning of the blade started to cook the egg and I could never get an emulsion. I just got oily goo. But I just bought a new KitchenAid mini-processor (3 cup quantity), and thought I’d give it a go in that.
Et voila ! One egg, one cup olive oil, about a couple of tablespoons of lemon juice, some salt and pepper (and I threw in a garlic clove and those Italian herbs). Blitz the egg, 1/4C oil, the lemon juice and the S&P in the processor, then drizzle in the rest of the oil. You have mayonnaise. I MADE MAYONNAISE ! It was sublime on that supermodel artichoke. Sublime. It took all my restraint to not just eat it out of the bowl with a big spoon. The only thing I would change would be to make it 50/50 olive oil and a neutral oil like canola the next time. I felt the olive oil was a bit heavy, but worked with the artichoke. Who knew mayonnaise (which is the single best substance on Earth) is yellow, not white? Not to diss Best Foods, but homemade blows it out of the water. Completely. Best Foods, I’ll always love ya, but when I have artichokes from now on, you can stay in the ‘fridge.
I MADE MAYONNAISE !!!

Oh yeah. The rest of the dinner was outstanding as well. Great way to deal with the tri-tip steaks. Artichokes, of course, never disappoint. And the bread, the bread, the bread……..simply rocked.
Sometimes, the unplanned route is the best one.
Tuesday, April 12, 2011
Bread...finally
So, it’s about time to get around to some actual bread, and maybe use some of that “Pound Of Yeast”, huh? One day last week, I had one of those magic days in the kitchen, where everything worked.
We’ll see the rest of the meal in a bit, for now we’ll focus on the bread. Yep. Bread, and a darn good one, too !
I’d pulled a recipe a bit back from “Food And Wine” magazine. I think it may have been the January issue….for sure it was early this year. It was for “Focaccia with Caramelized Onions, Pear and Blue Cheese”. It sounded divine, and I’ve been looking for an excuse to make it. It’s the tail end of pear season here in SoCal, and I’ve been indulging. I love pears….they have such an interesting texture (even though I know some people find the “grit” off-putting”, to me it’s a feature), they’re crunchy and soft and sweet and crisp all at the same time. Pear crisps have been in regular rotation, and just eating out-of-hand is never a bad thing. Especially with some cheese….and speaking of cheese…..
I had a Bosc that had been in the ‘fridge for way too long, and I was wondering what to do with it. Actually, I’d been saving it for this bread, but it never seemed to “go” with what my entrees were. When serendipity hit, the bread was a good fit. Plus, I had some bleu cheese looking for a use. Hmmm, sounds like a plan to me, especially since I always have onions in the house.
I mean, seriously. What’s NOT to love about caramelized onions, good bleu cheese (I used a Gorgonzola) and pears? On top of BREAD??? Hello. You had me at “caramelized onions”, quite frankly.

Here’s the recipe:
Focaccia with Caramelized Onions, Pear and Bleu Cheese
(Adapted from Food And Wine)
1C warm water
1 package active dry yeast (approximately ¼ ounce or 2&1/2 Tblsp.)
½ tsp. honey
2&1/2C all-purpose flour (divided use)
1/2C *plus* 1 Tblsp. extra-virgin olive oil (divided use)
1 tsp. kosher salt
1 large onion, thinly sliced
1 tsp. light brown sugar
1 large Bosc pear, cored and thinly sliced
1/2C crumbled bleu cheese
In a large bowl, or the bowl of your stand mixer, combine the water, yeast and honey and let sit for about 5 minutes. Add in 1 cup of the flour and ¼ cup of the oil and stir. Let stand for another 5 minutes. Using the paddle on a stand mixer, mix in the remaining flour and salt, and stir until blended. Switch to the dough hook, and knead until smooth. For me, in my kitchen, with my KitchenAid, that took about 10 minutes total. I’d recommend kneading in 5-minute increments and judging the texture of the dough at each point. (You can also do this all by hand, obviously. Mix the water, yeast and honey together as instructed, and let stand, then add the 1C flour and 1/4C oil. Let that stand again, then mix in the remaining flour and salt. Turn it out onto a floured counter or board, and knead until smooth and elastic.)
Transfer to an oiled bowl, roll the dough around so it’s covered with oil, cover with plastic wrap and let stand for about an hour at room temperature.
While the dough is proofing, slice the onion by cutting the onion in half, pole-to-pole, and then slicing pole-to-pole on an angle. This gives you nice, thin strands, rather than half-moons, which can get stringy when sautéed. Heat 1 tablespoon of the oil in a skillet. Add the onion, cover and cook over medium heat, stirring occasionally, for about 10 minutes. Add the sugar, cover and cook, again stirring occasionally, for another 10 minutes, or until browned. Set onions aside.
Preheat oven to 450°. Oil a 9x13-inch rimmed baking sheet, and cut a piece of parchment to fit the bottom. Lay the parchment in the pan, and lightly brush it with additional oil. Transfer the dough to the pan, and press it down to fit, using the flat of your hands. Once the dough is close to filling the pan, start to “dimple” the dough all over with your fingertips.
That will complete the “stretching” of the dough to get it into the corners and edges of the baking sheet. Drizzle with 2 tablespoons of the oil.

Cover the dough with plastic wrap, and let rise until it puffs, about 20 minutes.
Scatter the onions over the dough. Arrange the pear slices over the onions, and then scatter the cheese over that. Drizzle over the last 2 tablespoons of oil over the toppings.

Slide into the oven, and bake for 20 minutes or until everything is nice and golden. Transfer to a rack to cool for about 10 minutes in the pan, then use 2 large spatulas to remove focaccia from pan and return to rack to cool to room temperature.
Cut into squares and swoon.
Sunday, April 10, 2011
Gentle and Warm Comfort
This is not the post I had intended to write today. I had *intended* to post about a very good, if unplanned day in the kitchen I had earlier this week. That post will come, in time.
Today, I woke up late. Way later than I wanted to, even for me. And when I woke up, it was cold. And I was cold. Cold in the house, and cold outside, and cold in my bones and cold in my soul and brain.
Yes, cold. OK, it's a Southern California cold. The house thermometer showed it was below 65°F in the living room, and the patio thermometer read just a hair over that around mid-afternoon. For us, in mid-April, that's cold. And it was windy. We'd had a bit of a pseudo-storm blow through yesterday, which the weather weenies were saying was a very, VERY unusual, "winter-type storm event" in the Spring. Some areas got a deluge and thunderstorms, some areas got brief interludes of hail, and our local mountains got snow. Me? I got about 2 minutes' worth of spitting rain on Friday late afternoon, and cold winds from then 'til now. I have my heater running, and I can't remember the last time I ran the heater this late in the year, ever. And I've lived in this house for 40 or so years.
Anyway, for me, in SoCal, it's cold for April. And I had some tsuris in my mind and soul which made me colder. I woke up, let the girls out, and felt chilled to my core. I thought about running the errand I'd planned, and making the dinner I planned, but the only thing that sounded good to me was my blankie. So, after sleeping a bit longer than I ever intended today, and putzing around the house a bit, and reading a bit, and watching TV a bit (Saturdays are still good here for PBS cooking shows), I took a little nap with a couple of willing, snuggly dogs. When we finally roused ourselves, I realized we were still going to need to eat something. The girls of course, were easy. Pull the can of IAMS out of the fridge to warm up a bit.
For me, my first thought was, as it frequently is on these "cold, blue" days, just to have a bowl of cereal for dinner, and call it done. But that was too....cold. My next thought was what I call my "Bad Day Blue Box" of macaroni and cheese. Yes, I'm ashamed to admit it. I do eat (and enjoy, there, I've said it), Kraft Macaroni and Cheese. But I *HAVE* up-classed a bit from my childhood. At least now I get the "Deluxe" kind with the squeezie cheese goo, rather than the powder that has to be reconstituted. I like it. It's pure comfort food, and easy and warm in the tummy. Like a hug when I'm in that blue grumpy mood.
But today, on my way to the "Bad Day Blue Box", I spotted a package of konbu and a package of katsuboshi I'd purchased about a month ago at a local Asian market, with the intent of *someday* making dashi for "real" miso soup. I had the miso, I had the makings for dashi, I had some veg I could throw into the broth, so I decided I was there. No tofu. Don't stock it, don't like it. I've tried, still don't like it. I'll eat it in hot & sour soup, or miso soup, in a restaurant, but reluctantly, and mostly not to be a rube and offensive.
So. I did the requisite web search to find some proportions (because the instructions on both the konbu and katsuboshi packages were written in Asian pictographs I don't read), and off I went. I soaked the konbu in water for about 10 minutes, after wiping it down, then brought it to a gentle boil. Plucked the konbu out, and let the resulting broth come to a full boil. Then I dumped in the katsuboshi flakes, and stirred them around a bit. I cut the heat, and let them steep for another 10 minutes in the hot broth. Then I strained the broth through a sieve lined with a paper towel, back into another saucepan. As I was bringing the broth back to a boil, I tossed in some thinly sliced carrots. (The add-ins for miso soup on the web site I found suggested potatoes, tofu, sweet potatoes, carrots, scallions, peas, etc.) Again, this is a tofu-free zone, and potato didn't seem right to me. So I went with carrots, scallion and some beautiful, FRESH sugar snap peas from my CSA (we'll talk about my CSA in the future....they're amazing). After the broth got back to a boil, I ladled out about half of it into a bowl with the miso paste (I had red miso) and stirred it around to dissolve it. Then I stirred THAT back into the pot, added the thinly sliced scallion and peas, and let all of that warm up and soften.
This was the first time I'd made miso soup at home.
My first reaction was "it tastes just like what I get at Japanese restaurants". Which was a GOOD thing, because the dashi alone smelled, well......fuhhhnn-kaayyyyyy.
Then I took a big, deep breath, and realized I'd been warmed. I was....WARM. From the inside. From the outside. From my gut. Gently. That was how I'd describe that miso soup. Gentle. It was like someone wrapping a warmed blanket around me. My hands warmed up. My feet warmed up. My brain warmed up and my tsuris and blue grumpies vaporized.
I was warmed. Life looked a bit better. The storm clouds, literally and figuratively, cleared.
Unfortunately, miso soup is not tremendously photogenic, but here is the wonder broth that restored my spirit tonight.

The girls? They got the leftover veggies (carrots and peas, no onion) mixed in with their IAMS.
Yes, the heat's still running, but my world is warmer due to miso soup.
Subscribe to:
Posts (Atom)